
As a prelude to workshop on Masking in Photoshop, this Sunday, I wanted to share a simple tutorial that has a ton of uses. Clipping Mask is such a technique, that allows you to fill shapes, text, or any other layer in Photoshop with another layer. The result? You can fill text with images, make silhouettes, and change the colour of shapes/objects that are imported into Photoshop. And it’s actually very simple!
Clipping masks are among the most powerful, yet most misunderstood features in Photoshop. While most people are familiar with layer masks, clipping masks are still woefully underutilized, despite their flexibility. You can attribute much of it to a basic misunderstanding of how they work and how they differ from layer masks, and a general reluctance to try out a new tool.
Before we can dive deeper into clipping masks, we first need to understand how masks actually work in Photoshop. Masks effectively act as transparency controllers in Photoshop. When a mask is active, it makes the underlying layer transparent (the degree of transparency can be controlled as well). When it is switched off, the layer becomes opaque and visible again. Think of it like a mask in real life, except in reverse – putting on the mask reveals what’s underneath (instead of hiding it).
Clipping masks are theoretically similar to layer masks, albeit with a few key differences:
- Clipping masks can be applied to multiple layers, while layer masks work on just single layers.
- Clipping masks act as layers themselves and thus, can be stacked, just like normal layer. A layer mask, on the other hand, is merely a modification of a layer.
- Since clipping masks act as layers, you can apply multiple effects to them. In contrast, layer masks can only be used to control transparency of underlying layer.
To illustrate the clipping mask, I first want to show you how to create one using a photo masked over text. Note that in order to complete this tutorial, you’ll need some basic working knowledge of Photoshop, specifically how to use the Move and Type tools, as well as how to open images and adjust image sizes

In Photoshop, open up the background image you plan on adding the text over, and re-size it to your requirement. In our example, I’m using two pictures from my Lakshadweepa Trip. The sunset picture is used as my background image.
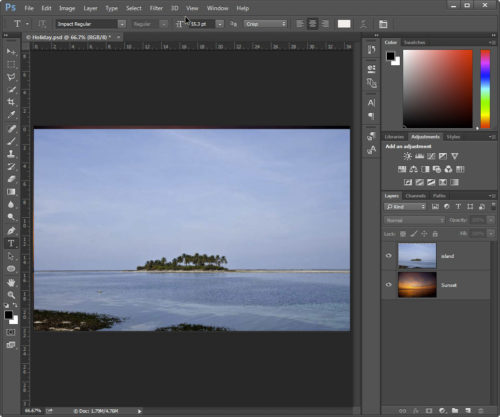
Next, open up the image that you’d like to mask the text with. Again, in our example, the ocean with island picture is the masking image. You can resize this image if you’d like, but it’s dependent on how you plan to use the image to mask over the text. More about this in a second.

Add the text to your background image. With masked text, I usually find that larger, blockier text is going to look better and really show off the clipped image. I have used Impact font which gives that thick blocky appearance.
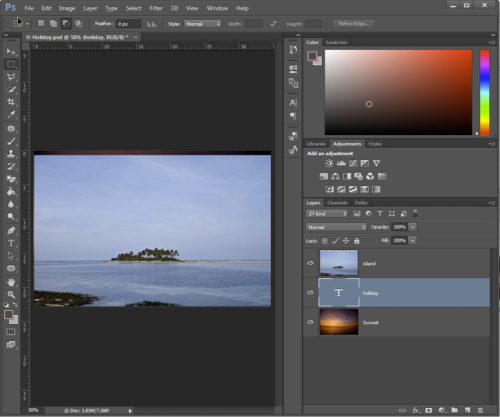
Now, move the clipping image (island) onto the background image (sunset) document. You can do this using the move tool to drag it over to the document tab.Here’s where things get really important. Over in your Layers palette, be sure that your clipping image layer is above the text layer, as it is in the screenshot above. The order you should see within the Layers palette is Clipping Image, then the text, then your background layer.

Right click on the clipping image layer — the one on top of the text layer — and select Create Clipping Mask. After you select it, you’ll see a little right angle arrow appear on this layer, indicating that it’s clipped to the text layer below it.
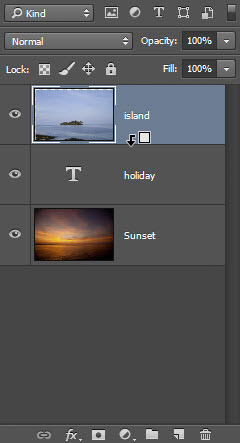
There is a shortcut method of doing the same. Position your mouse pointer over the border between the two layers (island & text) and hold down the Alt key (Option key on the Mac). When the mouse pointer changes to two overlapping circles downward pointing arrow & a box, click once to create a clipping mask. This is also accomplished by clicking the topmost of the two layers and choosing Layer > Create Clipping Mask.
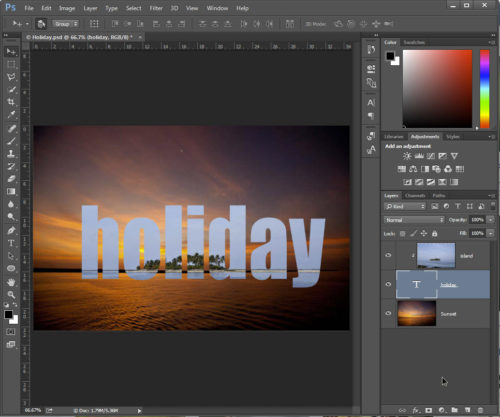
Now, in the document, you can see that the text is filled with the island image. Even though the image is clipped to the text, you can still move the ocean image around independently of its text layer, making it larger, smaller, or simply adjusting what part of the image you want to appear in the text. For example, I can use the Move tool and move it so that I can position the island where I want. You can also lighten or darken that island layer using adjustment layers.
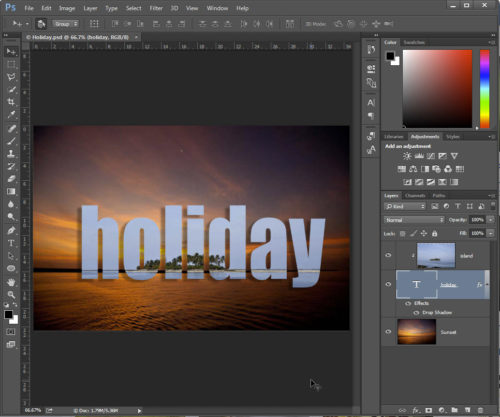
The text layer also can be modified, both for its size or if you want you can change the text content as you want. Here I have added the drop shadow to the text to make it stand out. Even though I have in this example used a text layer, the technique can be used in all type of layers, fill shapes, or any other layer. You can fill text with images, make silhouettes, and change the colour of shapes/objects that are imported into Photoshop.
On Sunday, 12th July 2015, I will be conducting workshop on masking, selection, sharpening and noise removal, using Lightroom and Photoshop. Under Creative Focus, I have been conducting these specialized workshops on advanced photography as well as on post processing techniques. With over 25 workshops conducted for the pleasure of discerning aficionados of the art form, over the past two years, every event is tailored with practicality and ease of orientation in mind, exclusively conducted for an intimate gathering of only a handful of participants, ensuring an even, steady approach to learning, and clarified concepts. To join, please contact me.


Nice
Really great article. Thanks for taking the time to explain things in such great detail in a way that is easy to understand.
Your critical analysis of the Background Removal instruction struck a chord with me. However, I have a blog that will clarify things. I appreciate you publishing the post.