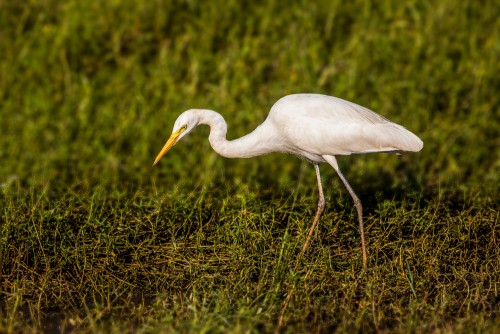
Shallow depth of field can make the sharp subject stand out from the blurred background. If you want a similar effect when using smaller aperture like f/5.6 or f/8 which usually has larger DOF, you need to opt for Photoshop. This is a manipulation of your capture and ethically I do not support such gross manipulation of the image. But I am appalled to see many are doing a very shoddy job of blurring background, I thought I will give a tutorial on how to do it effectively and efficiently. Use it sparingly to blur the background and sharpen the subject using high pass sharpening, you will produce a wonderful picture. Post process should be such that it should not feel that the photo is post processed. Even though every blurring tool available can do that job, Adobe Photoshop’s Lens Blur filter in Photoshop works best.
Natural looking blur that results from a good DOF is gradual. The blurring gets stronger as the distance from the focal plane increases. So to get a realistic final image you cannot simply apply add any blur and cut out the part you want to be sharp. Your image would simply look that way as if you cookie cut the subject from a smoothly blurred background.
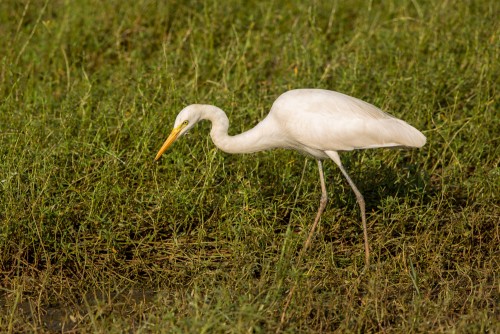
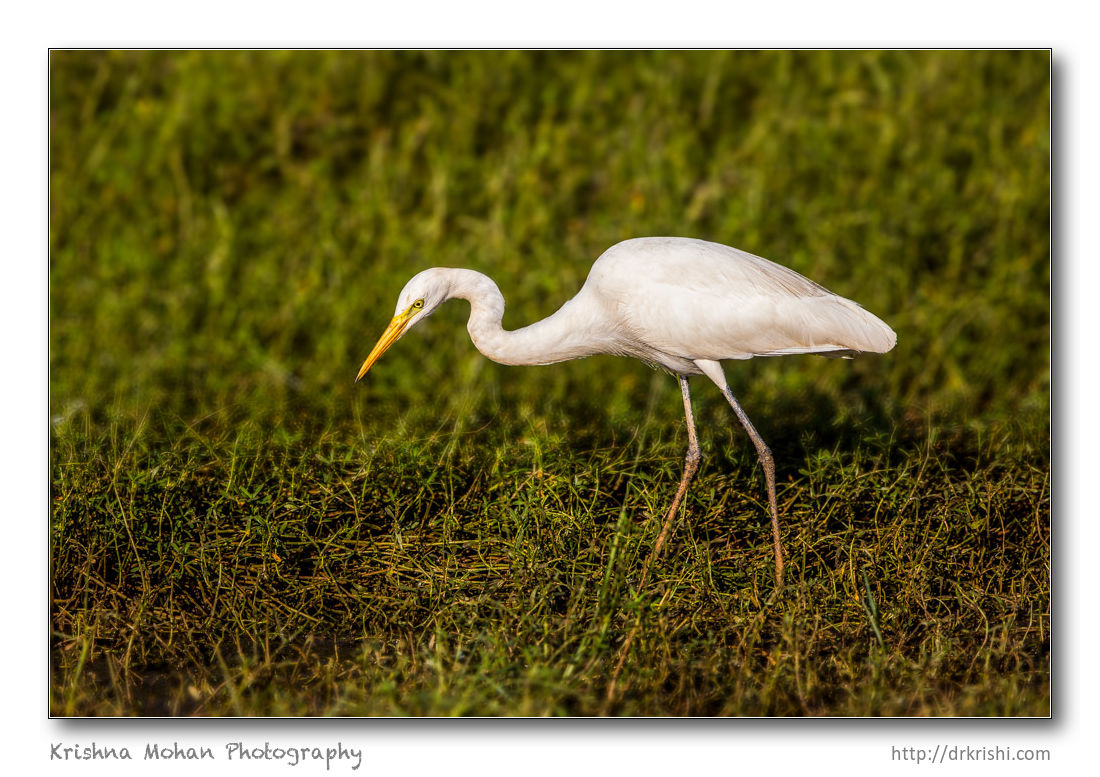
For this tutorial I have used this Intermediate Egret which was shot using Canon EOS 5D Mark III with Canon EF 500mm f/4L IS II USM Lens + Canon EF 1.4x III Extender on Gitzo GM5541 Carbon Fiber Monopod for this capture. Since I wanted a sharper result I used f/8.0 aperture. This gave a made a deep depth of field. The close proximity of shrubs all around the egret in that marsh as well as higher angle makes quite a bit of clutter around the bird and does not make it stand out. Let us open the egret in Photoshop.
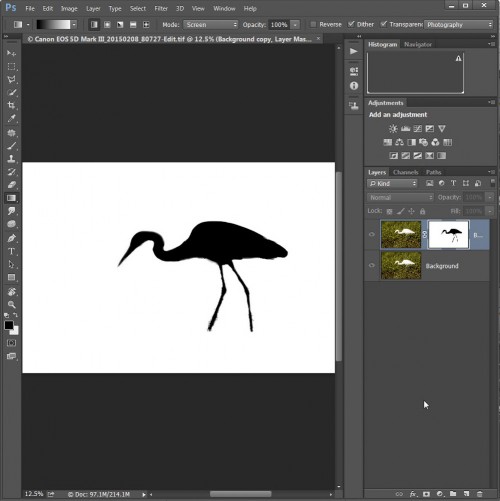
Step 1 – Selecting or masking the bird
We want the full bird to be in focus, so we’re going to create a selection of the bird that we’ll use later to cut a hole in our blur effect. If you prefer you can save that selection as a mask too. Selection or mask both do the same job. Perform these tasks in another layer than doing directly on the original. Duplicate the layer and select the bird. Selection can be accomplished in many ways. You may wish to use the Pen tool, but I found that Adobe Photoshop’s “Quick Selection” tool allowed me to get most of the shape in about five seconds. Just amazing!
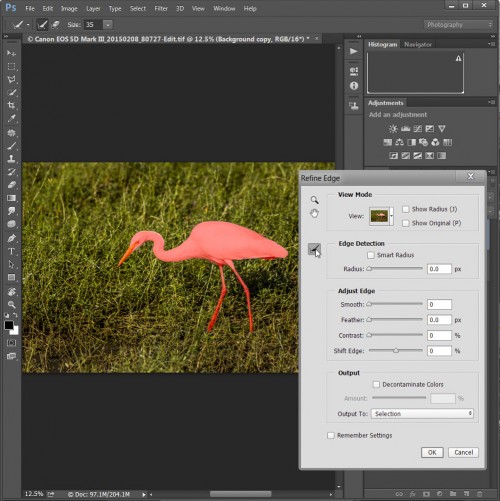
Step 2 – Refine the edge of selection
Since the quick selection is a crude selection I can after finishing the rough selection right click and choose “Refine edge” tool. This tool will help you to refine the edge of the bird. The time you spend in refining your mask will be well worth it. The finer your selection is, better you can use various effects on it.
Make sure that you have perfect edge at the end of the refine edge tool. The hair details need to be perfect. You can use the refine edge repeatedly and keep trying to get that ultimate selection. Please go through other tutorials how to perfect your masking using refine edge.
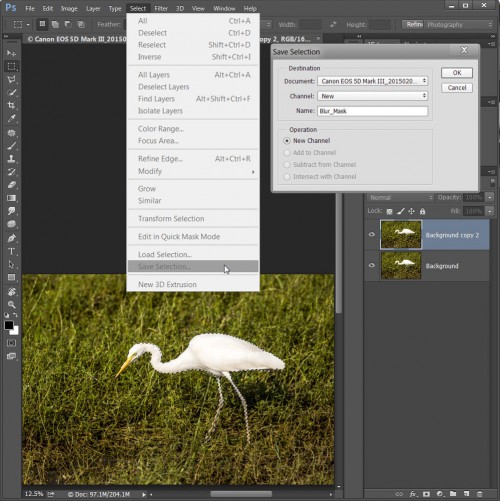
Step 3 – Save the selection for later use.
Once you have a selection which is perfect, you need to save the selection. If you have already created mask out of it, activate the selection (ctrl /cmd + click on the mask) and let the marching ants show. Go to Select -> save selection and give it a name. Here I have named it as blur_mask.
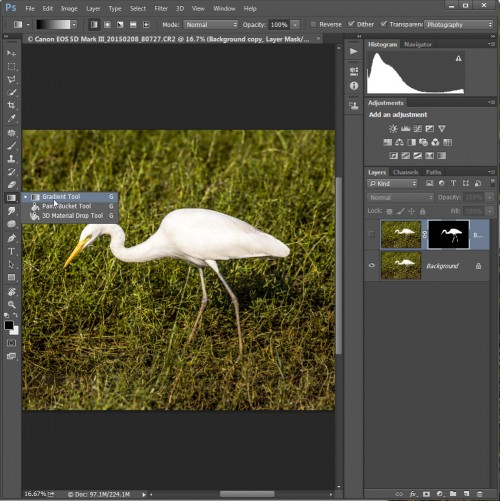
Step 4 Prepare Gradient for the blur effect
Remember that blurring due to DOF is a gradual change from sharp to unsharp. So we need to create a gradient mask that will generate that effect. Select the gradient tool, and choose the gradient that flows from black to white. Use normal drawing mode. (This is usually the default) from a point considered the focal plane, (the area in focus)
Generate the first half of the gradient (keeping in mind that the blur increases in front and behind the focal plane).
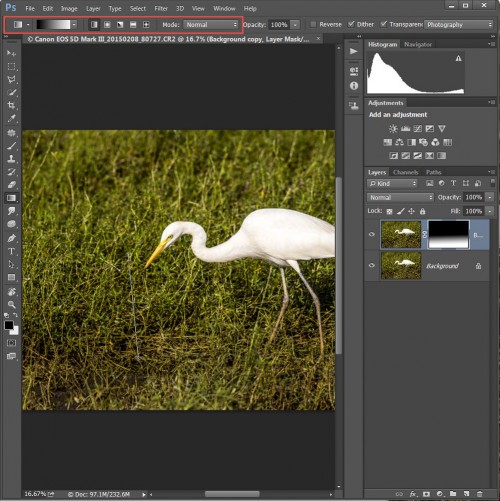
After selecting the gradient tool, draw a line from the end of the bird’s leg till the thigh. This will create a smooth gradient where everything prior to the starting point is black, and everything after your stopping point is white. This section will be used to define which area will contain blur. Remember when using masks that black blocks the effect, white allows the effect. Those who are keeping up so far will realize that this means only a small sliver of the grass in foreground of the bird will be blurred. You are correct! Now we need to send the blur in the opposite direction as well.
Step 5 Create the top half of the gradient
This gradient tool will fill in the whole image area and you cannot simply create the top half of the gradient. If you try this, you simply wipe out the prior gradient. This can be frustrating and non-intuitive, even though it really makes a lot of sense once you get used to it.
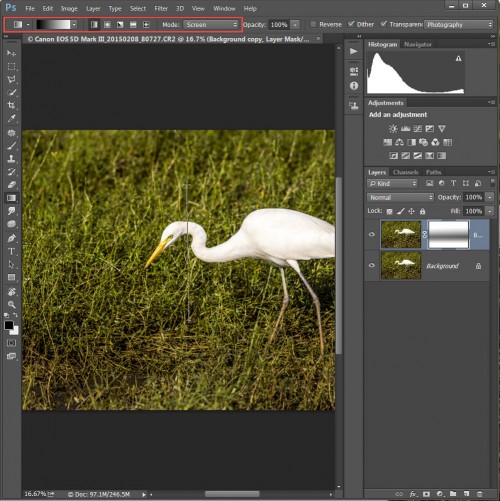
So, to add to the gradient mask we’ll again use the gradient tool, but this time make sure you set the Blending Mode to “Screen”! What does Screen do? Well, essentially it says that anything in black will not affect the image. We’ll next draw our gradient again starting from mid-thigh to the top of the bird. Due to screen mode, anything drawn in black (our starting point and below) will not affect our image. Only the white is ADDED to our existing mask.
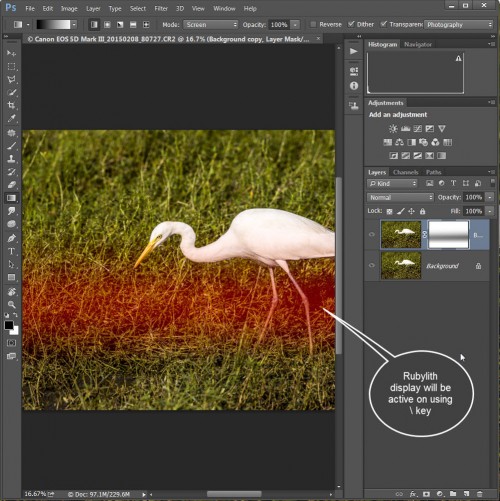
You now have this mask created out of two gradients. If you take a look at the rubylith (use the ‘\’ key to turn this on and off) you’ll see red where the mask exists. If the red does not cover the right areas, clear the whole mask and start again. Trying to adjust the bottom or top using screen mode will not have the additive effect you might expect.
Remember this will be the area which shows in the final image, as sharp area of depth of field. Notice how the mask transitions smoothly from the bottom of the bottle in both directions (forwards and backwards from the central focal plane). DOF extends for some distance around the plane of focus. Generally, the area considered to be in focus extends about 1/3 of its distance in front of the focal plane and about 2/3 of its distance behind. You can look up all sorts of information about this if you want to learn more, but try to keep that in mind when creating masks for DOF.
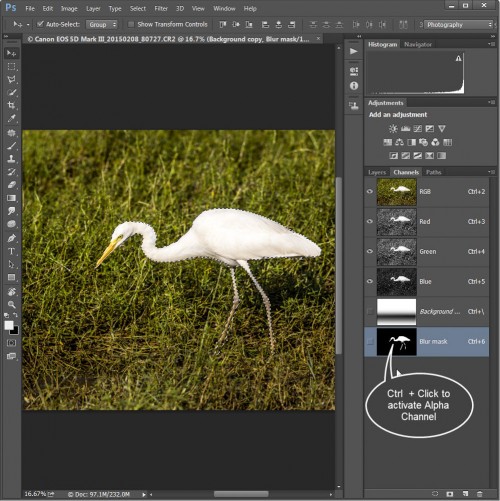
Step 6 Add the selection of the bird to the gradient mask
Go to the Channels pallet and find the mask that you saved earlier (blur_mask). It should be at or near the bottom. You’re simply going to CTRL-Click on this mask. Doing so actually selects the area defined by that channel. Now go back to the Layers pallet and select the gradient mask. Be sure to select the mask and not the actual image of the bird.
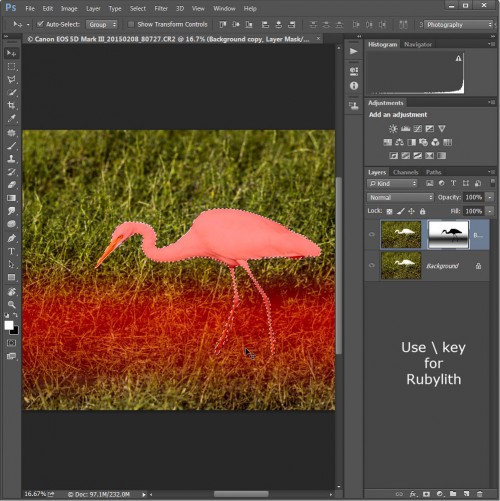
Set the background drawing colour to black. With the gradient mask selected, and the selection obtained from the bottle’s mask in the channel pallet, we will press CTRL-Backspace. This results in the selection area being filled with the background colour. In this case, black.
What have we done? We’ve added the bird mask to our gradient mask. We have now defined all the areas that need to be blurred and those that need to be in focus.
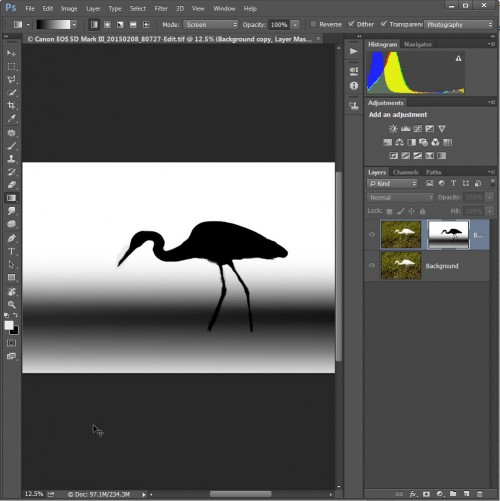
The resulting mask looks like this
Step 7 Lens blur
Again, select your image with its mask and make sure the mask is NOT selected. Choose Filter > Blur > Lens Blur… from the menu.
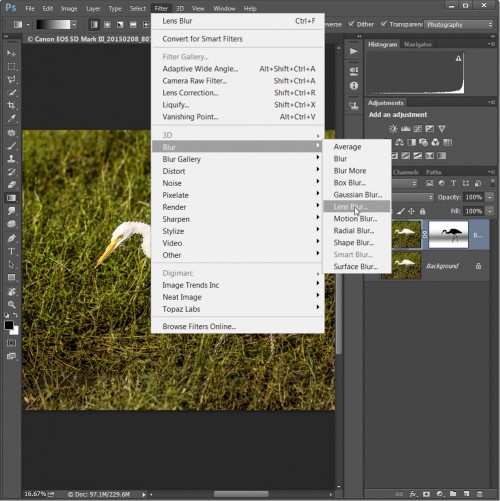
This opens a rather large dialog box to work in. First thing, make sure you have the button at the top labeled “Faster” selected. More Accurate is just that, but certain functions cause the response to plummet to an unusable pace. I recommend not using the More Accurate setting.
Generally the lens blur will blur the entire image just like Gaussian blur and most other filters. But, lens blur takes this a step further and allows you to use your layer mask to actually affect exactly to what degree the lens blur emulation occurs. In other words, the bokeh and specular highlights are rendered based upon the distance from the central focal plane. This focal plane is defined by the gradients in your layer mask. Black has no effect (totally in focus), white is full effect (totally out of focus).
In order for this to occur you need to choose the source for the Depth mask. Remember there is also our saved alpha channel in that list of sources. Do not select it as it contains only the bird and not the gradient. You need to set the Depth Map Source to use “Layer Mask” which is combo of bird and gradient.
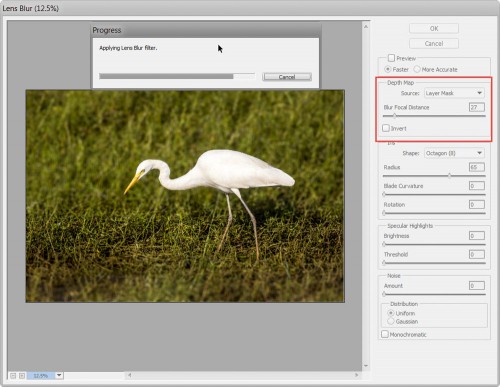
The Blur Focal Distance slider that will adjust the focal plane to a location between depths of field. Useful if your gradient was misplaced or needs slight adjustment. Play with it and see how this works. Here I needed a value of 27, yours may differ.
My lens has 8 blades, so I set the Iris Shape to “Octagon (8)”. The Radius is basically the blur amount. At 100% it works like f/1.4 blur. For this image I tried 65% as I did not want to go to such an extreme. I left Blade Curvature and Rotation as-is at zero.
Specular Highlights will cause those balls of light to appear over highlights. Your iris shape will affect the appearance of these shapes just as they would form the lens on your camera. Slight adjustments of these settings can make a huge difference. I used settings of Brightness set to 0 and Threshold set to 0.
Note: turning this on by setting Brightness above 0 and Threshold below 255 will cause the feature to turn on and slow down the rendering significantly! If your image has a lot of highlights or areas that are virtually white, the processing time increases even more.
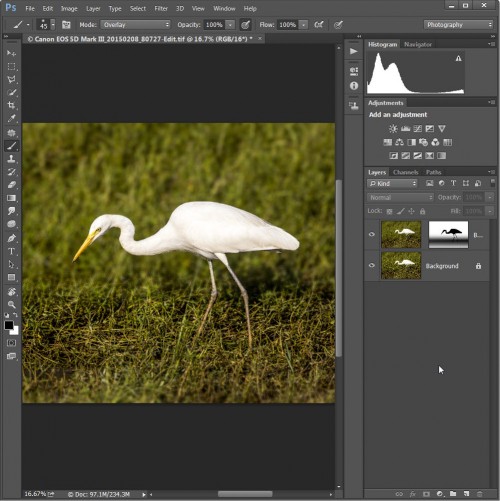
Step 8 Lets check out the results….
I would not say that Lens blur is the be-all, end-all to processing a blur effect, but it gives a pretty good result. Once you play with the workflow a bit, I think Lens blur actually ends up being a decent part of your workflow especially if you have a slow lens of maximum aperture f/5.6.
don’t over do this effect as it can be addictive. If you find the results are not up to the mark suspect your masking effort or amount of radius used in the lens bur. You can retry the effort on a new layer from the original using same mask and better refinement.
Have a happy Photoshopping and please be ethical 🙂

Very helpful for me,thanks a lot Sir.
ಆಯ್ಯಪ್ಪ! ನಾನು ಇಷ್ತುದ್ದಕ್ಕೆ ಓದಿದ್ದನ್ನು ಅರಗಿಸಿಕೊಳ್ಳುವುದರಿಂದ ಬಚಾವ್!! ನನ್ನಲ್ಲಿರುವುದು ಕೇವಲ ಒಟ್ಟೆಮ್ಯಾಟಿಕ್ ಕೈಮರಾ ಮಾತ್ 😉
Wonderful tutorial, Krishi. Thanks for step by step explanation, thus making it sound so simple!
GIRI
Hi,
Simply great to see your dedication in photography, considering you are a surgeon
I am also an ENT surgeon and have developing photography as hobby.
I stay in a small town called Ichalkaranji, Kolhapur Maharashtra
We have formed a photography enthusiast group names Impression Photography Club (IPC) and are doing monthly meetings and both short tours and long tours.
Please visit our website – http://www.photorasik.com
Just like you, I am a keen new things learner. The website is totally managed by me. ( of hand a bit lazy though)
I recently bought Canon 7d mark 2. Previously had basic 1100d, which I sold.
Now I have 50mm f/1.8, Tamron 90mm f/2.8 without IS,
Canon 18-135 IS STM and 50-250mm kit lens.
Now I want to add a new budget lens for bird photography.
Very confused between Canon 400mm f/5.6 & Tamron 150-600 VC & new Canon 100-400
So please guide me in this regard.
Thanks,
Dr. Vikas Bargale