The other day, I found a Long horned beetle clinging to the siding of my house. I grabbed my trusty Canon 5D Mark II and a Canon EF 100mm f/2.8 USM Macro lens and my Feisol tripod. As I could not get all the parts of this beetle in focus I remembered the auto-align and auto-blend trick I had seen in the new Adobe Photoshop CS4. Previously I had tried focus stacking using freeware combinez5 which produced fantastic results. On the web I could get quite a few video tutorials like this and this, explaining their technique but there was dearth of written tutorials with pictures. Probably it is easier nowadays to create a video tutorial and post. So here is my humble effort to show you how I did this. I recommend that you download the latest update of Adobe Photoshop CS4 11.0.1 which updates and improves the quality of the results of Auto-Blend Layers.
I shot this beetle which was sitting on a white dining mat. As the depth field at 1:1 macro setting was too shallow. I took 10 sequential shots maintaining same exposure settings on a tripod but just altering the point of focus little by little. I usually start from the nearest point which I try to be in sharp focus then try little further until I reach the last shot which has the farthest point in focus. Best method to do this is fix the focus on the lens and move the camera little by little forward and keep taking pictures of different focus points. This avoids the geometric distortion all together. Make sure while doing so you make sure that the exposure, speed as well as focus all are locked. This needs a real steady hand or a focusing rail connected to the tripod head.
If you don’t have them then you can try getting the shots by fixing the camera on the tripod and altering focus of the lens by adjusting manual focus ring. Auto focus is a big NO for this technique. Now with Adobe Photoshop CS4 you can easily correct the geometric distortion introduced by adjusting manual focus.
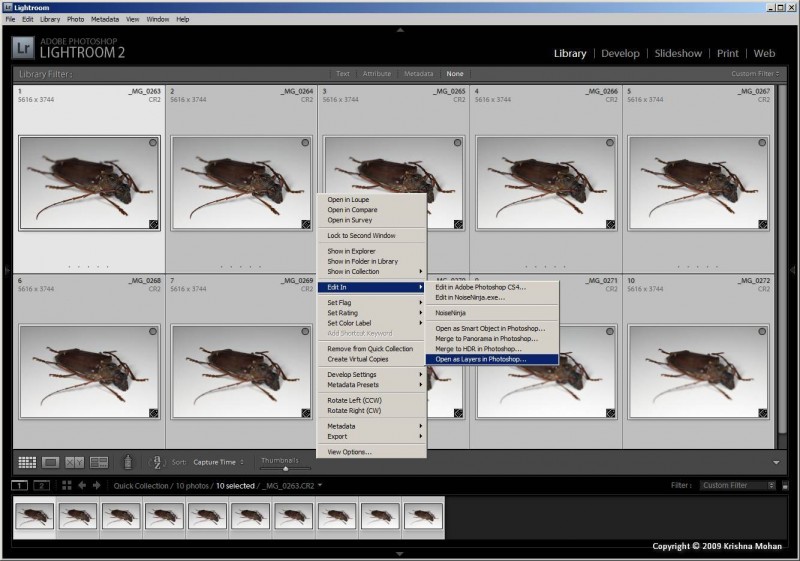
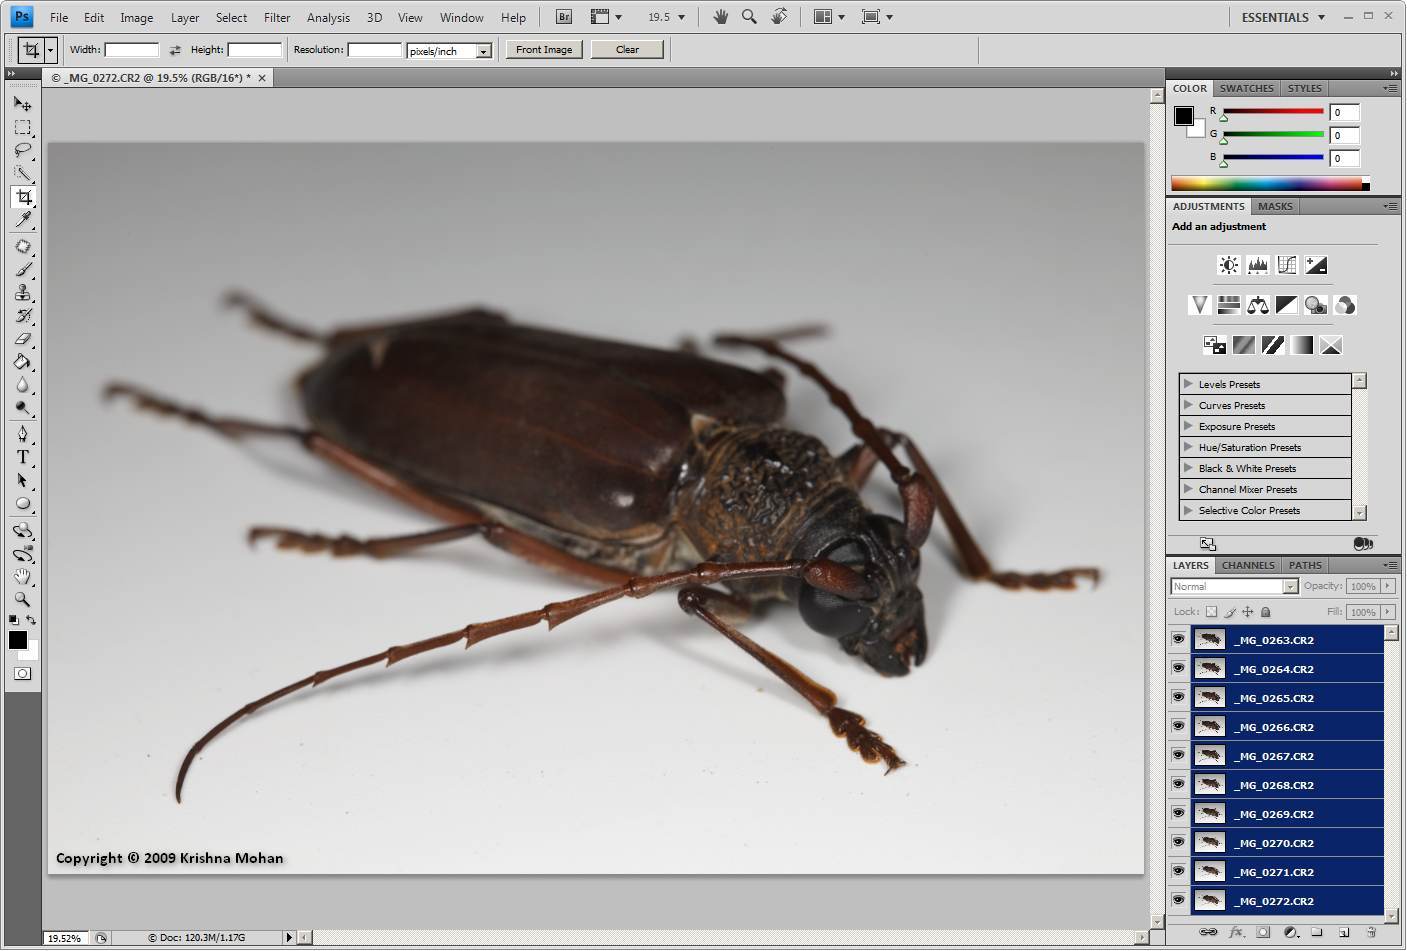
My work flow involves Adobe Lightroom 2.3 which manages all my files on my hard disk. Once you import the files from your card, select all the files which need to be blended and choose the option of edit in > Open as Layers in Photoshop. The step is same if you are using Bridge instead of Lightroom. Now Lightroom exports all the files to Photoshop into a single Photoshop document with multiple layers. Each layer consists of a single image. Here I have 10 images of this beetle consisting of various areas of sharp focus resulting in 10 layers in the Photoshop document.
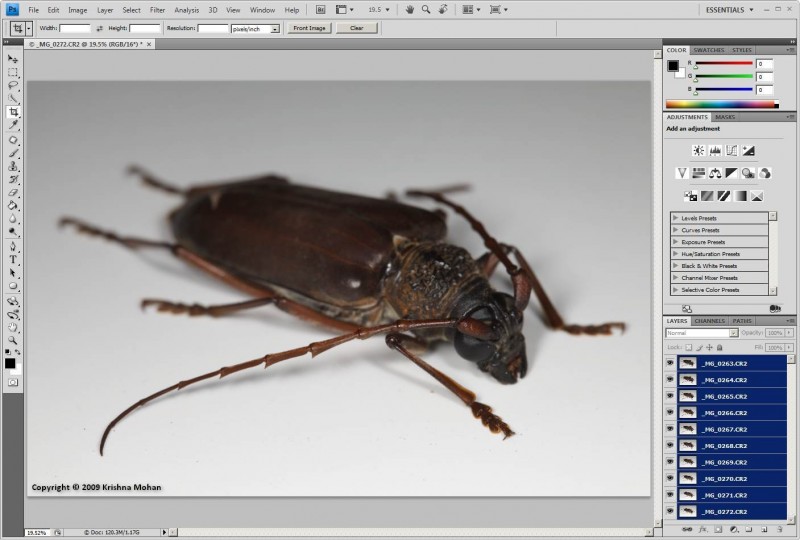
In Photoshop choose Select > All Layers.
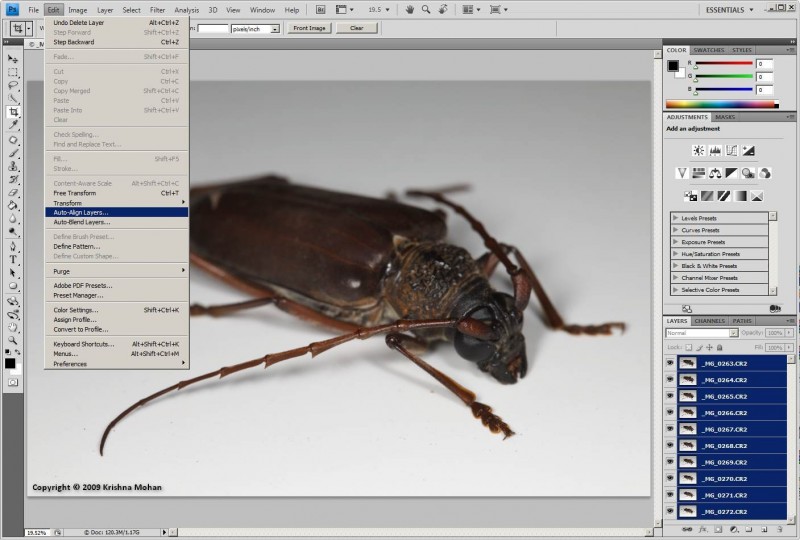
Then choose Edit > Auto-Align Layers. The Auto-Align Layers dialog box opens.
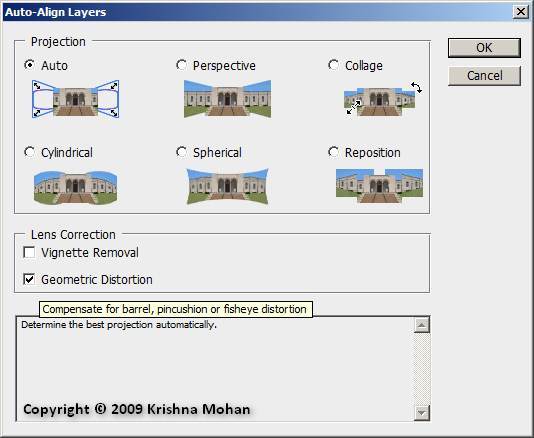
Note: The Auto-Align Layers dialog box has a default Lens Correction setting of Geometric Distortion. This setting gives you the option of compensating for geometric distortion. In addition, the default Projection setting is Auto. When Auto is selected, Photoshop finds and compensates for certain kinds of lenses based on meta data information.
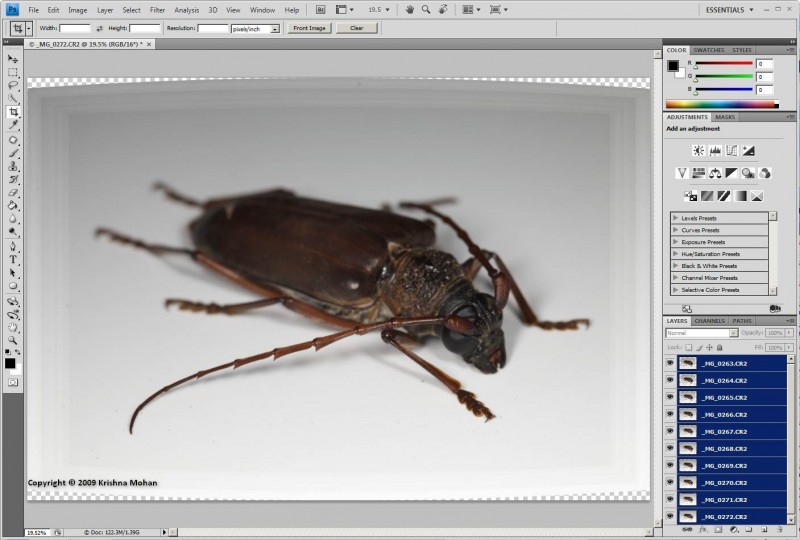
Now click OK to view the Auto-Aligned composition. Now all the images are perfectly aligned. You might notice the edges of the picture seems warped this is because Adobe Photoshop has now corrected the geometric distortion.
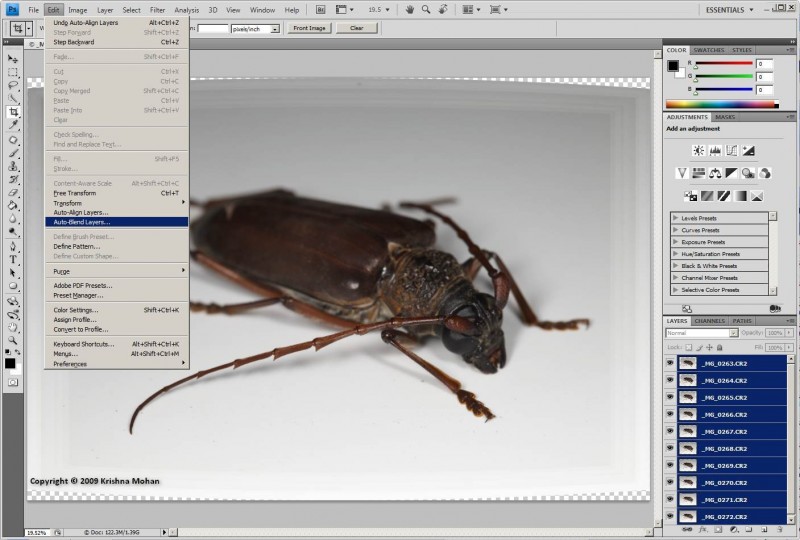
With all Layers still selected choose Edit > Auto-Blend Layers.
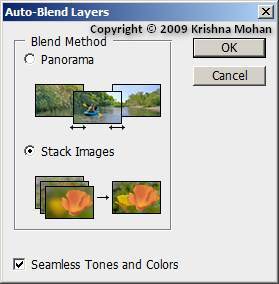
Select Stack Images from the Auto-Blend dialog box. Leave Seamless Tones And Colors selected.
Click OK.
If we had not done auto-align before doing the auto-blend then the geometric distortion would be there in these images. And that gives a strange halo effect near the edge of the beetle. So it is always advisable to run auto-align before auto-blend.
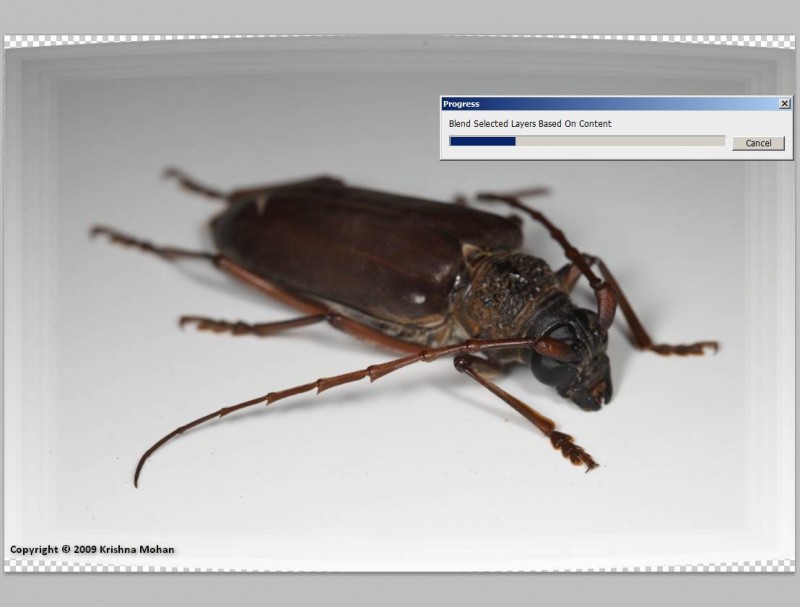
When you turn on the layers, you can see that the images now contain deep focus with all the points in focus.
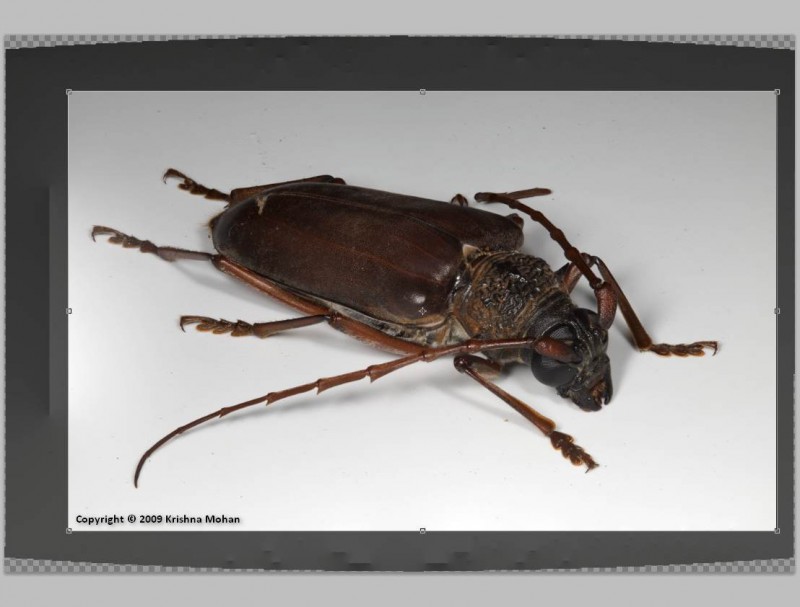
Now its time to crop the edge so that main image looks clean. It also gets rid of the warped edges. Now its time to save the image and get back to Adobe Lightroom to further process if necessary. I found many a times the resulting image needs some exposure correction which can be easily done in Adobe Lightroom. Now here is the final image as exported from Adobe Lightroom.
Hope this tutorial was helpful, please ask me any steps if you have found difficult to follow. Please enter your valuable comments so that I can improve on my tutorial.

Good tutorial. Thanks for sharing!
Anirban Brahma,
Thanks a lot for compliments. I have always loved your work ever since I saw your photo first at Better Photography magazine.
Regards
Krishna Mohan
Nicely done, complete, concise, and easy to follow. THANKS
J Westveer
Thanks for your nice comments
Thanks for taking the time to put this together!
How does the image quality of the results from photoshop compare to combinez5?
Nate,
Thanks for the comment.
I am trying to evaluate between CS4 & Combinez5. Preliminary results show Combinez5 is better than cs4. I want to check thoroughly before publishing the result.
Regards
Krishna Mohan
Thanks for the very clear, helpful explanation.
Dear Gil Hillman,
Thank you for your appreciation.
regards
Krishna Mohan
Very nice tutorial. Tfs! Check this out: http://www.flickr.com/photos/prodigi/3780568746/
and the video here: http://www.youtube.com/watch?v=ifoIMcTHRz0
I followed your steps and it worked well. Thanks! 🙂
Jeremiah, Thanks for visiting my site. Great to know that my tutorial was helpful to yu.
Regards
Krishna Mohan
Thank you I found this most helpful
Thank you for your comments Ailsa
Regards
Krishna Mohan
Thank you. Thank you. Thank you.
Great info
thank you for the tut! it was easily understandable and help a lot! and your photos are amazing!
argo pakkas
Dear Argo Pakkas,
Thanks for compliments. A lovely site you have over at Flickr. Keep visiting
regards
Krishna Mohan
I heard about this last night in my local photo club. I had never heard about it before. I googled this morning and found your site. My question: do you follow the same steps in PS5?
Hi Ross Peebles,
Thank you for visiting my blog. In Photoshop CS5 too the same procedure works and they have enhanced the detection and blending in CS5. If you need any more help please let me know
Regards
Krishna Mohan
hey thanks for this tutorial its going to help me alot in my macro
Great tutorial – used it on Antelope Canyon shots! Thanks.
Thanks! This is AMAZING!
I
CS2 to CS5 is quite a bit of improvement. Go for CS5 instead of CS4 as CS6 is due anytime now. User interface hasn’t changed much between CS2 to CS5. So you will love the new interface which is much less daunting than that from CS2. You can also try out Photoshop for 1 month from Adobe website before buying it and then decide on purchase.
Regards
Krishna Mohan
Well done explanation. I prefer written over video. Hard to stop the video and think about a step.
Thank you, Jean Eichenlaub
Krishna Mohan
Exactly what I was looking for. Thanks for taking the time to put this together.
Cheers!
Thanks Byrko for your great compliments
Thanks, exactly what I needed. I was close but wasn’t quite there until you showed me a couple of pointers.
lj
Thanks Larry Johnston
Thank you once again for highliting this technique. It is time i study PS too along with LR.
A fantastic tutorial. This idea was behind my imagination, I appreciate ur pleasure of being generous.
Thank you Santhosh.
Excellent tutorial! thanks a lot for your sharing!
really helpful, wish to see more articles like this one.
Thanks for your compliments 🙂 I will try incorporating more such tutorials.
I write my true review, Its very help full for me for my photography, Now I take much better sharpening images in nature and insect photography. I just love it. Thanks for Sharing sir.
Great tutorials. Thanks for sharing this brilliant post.
Good Tutoril Thanks For Sharing